Intro to Life on the Urban Farm
Intro to Life on The Urban Farm

ASK US ABOUT OUR INTRO TO LIFE ON THE URBAN FARM FIELD TRIP! 🧑🏽🌾🎉💕
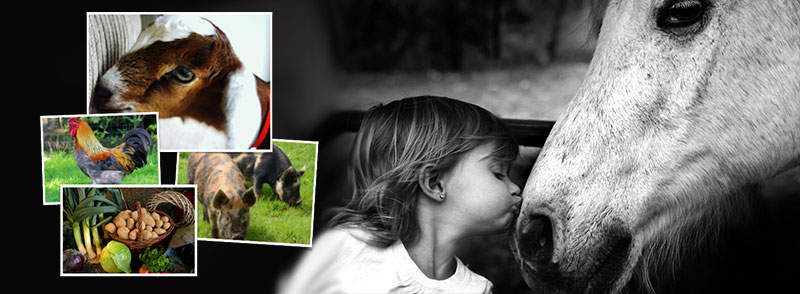
In our society today, 1 in 3 children are on a fast track to develop Type 2 Diabetes. And an overwhelming majority of the children in our cities have never actually seen a real farm animal.
An “Intro To Life on The Urban Farm” field trip will offer an introduction to healthy organic nutrition and it’s benefits via our Edible Forest, Grant a meet and greet with some of our selected animal family and provide a stress free break on the farm from life in the big city.
Our aim is to teach children about natural and healthy food choices which will lend itself to better life choices as they grow and continue to learn.
It all begins now, with our children and education. This enables minds to open and grow for a better tomorrow.
Some of the activities that the visiting children will participate in include:
- Making their very own butter/jam
- Engage in selected arts & crafts
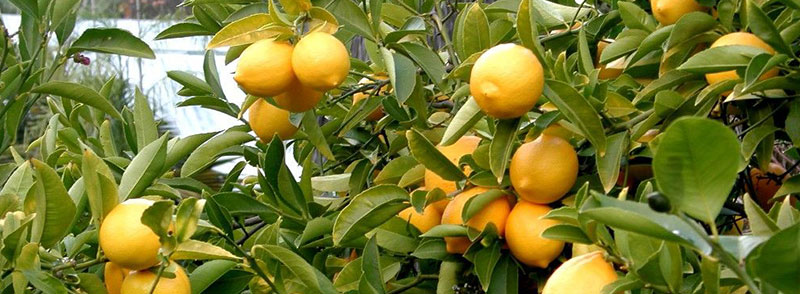
- Harvesting and tasting treats from our Edible Forest
- Visiting our animal habitat sanctuary, to learn about common farm animals like the chickens, pigs, rabbits, goats, etc.
- A meet an greet with selected animal family
Lessons
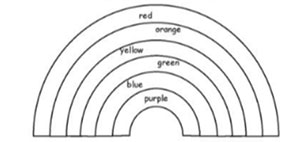
Eating the Rainbow

Students will learn to identify new fruits and vegetables. Students will use magazines and marketing ads to cut out various fruits and vegetables to create a rainbow art installation. Students will work together to select fruits and vegetables of varying colors from the art installations to create a fruit salad. The students will associate fruits and vegetables with a positive experience making a fun art project.
Students will:
- Identify Fruits and Vegetables
- Learn the importance of variety in eating
- Learn the vitamins/ nutrients that various fruits & vegetables offer.
Time Required For Lesson: 3 Days
Materials /Resources:
- Construction paper
- Magazines,
- Marketing ads
- Photos of different healthy fruits and vegetables in a variety of colors for each child
- Scissors
- Glue
Pre-activities: Students should discuss and identify fruits and vegetables in the varying colors of the rainbow.
Scissor Safety Activities: Each student will receive a piece of construction paper with a pre-printed rainbow on the paper. Students should determine and locate various fruits and vegetables in the magazines and marketing ads, cut them out and paste.
Post art project. Students will collaborate to select one fruit / vegetable from their art installations to represent each color of the rainbow. The instructor will prepare (Clean/Cut) the selected fruits prior to next class. In class the instructor and children will combine the selected fruits to create a rainbow fruit salad. Enjoy eating the rainbow!
Resources:
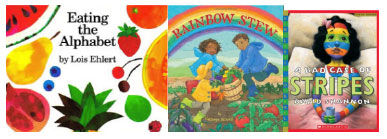
- Eating the Alphabet – by Lois Ehlert
- A Bad Case of Stripes – by David Shannon
- Rainbow Stew – Cathryn Falwell
Life Cycles
Students will plant their own seeds in potting soil and measure plant growth. Before the students’ plants are visible above the soil, students will explore the parts and functions of classroom plants and compare growth between the classroom plants. Using the weather channel website, students will predict whether the day’s weather conditions are excellent, good, or poor for plant growth.
Students will:
- Identify parts of a plant.
- Plant their own seed and foster it’s growth.
- Compare data to produce class graph of plant growth.
Time Required For Lesson: 2 weeks
Materials / Resources
- potting soil
- seeds
- clears plastic cups
- water
- crayons/ marker
- poster board
- post-it notes
- ruler
Pre-activities
Students should evaluate various environments and determine which types of environments promote plant growth. Students should also be introduced to the various parts of a plant and their purpose/ duty in plant survival .
Activities
Students discuss the different parts of a plant. After the introduction students plant their own seed to evaluate plant growth. Each student uses resources to plant their own seed. Each student will care for and observe the seed that they have planted. They will use their own plant to, discuss and identify the parts of the plant. Discuss each part and how it helps with the survival of the plant. Discuss the needs of the plant. As the class begins to observe plant growth, correlate and compare plant growth and weather conditions each day.
If students are comfortable with the measurement process, introduce the ruler. Students will become familiar with the inch and will measure their plants using a ruler daily.
At the conclusion of the unit, students measure their plant and record their plant height and place it on our class graph.
Resources
Farm Animal Exploration
Students will learn about the various animals that are commonly found on a farm and discover their purpose to the farm and the community, along with the benefits that each animal offers.
Students will:
- Identify various farm animals.
- Discover what each animal produces/ Its benefit to the community.
Time Require For Lesson: 2 Days
Materials / Resources:
- plastic containers with lid
- whipping cream
- sea salt
- bread
- spreading spatula / butter knife
- paper plates/ paper towels
Pre-activities: Students should discuss animals that are commonly found on the farm and be introduced to the product that each animal yields / Its benefit to the community. Utilize education props to teach what each animal looks like and sounds like.
Activities: Students discuss the different animals on the farm.
- Make Butter – Make some homemade butter with your children. Fill container about 1/4 full with whipping cream, add a pinch of sea salt and secure the lid. The children will have a blast as they shake the containers until the cream turns to butter. Spread the butter on whole wheat bread for a delicious snack.
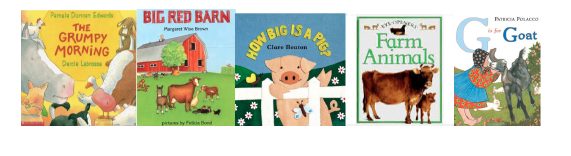
Resources:
- Animals & Their Sounds
- How Big Is A Pig – Clare Beaton
- Big Red Barn – Margaret Wise Brown
- G Is For Goat – Patricia Pollaco
- The Grumpy Morning – Pamela Duncan Edwards
- Farm Animals
The Good, The Bad, The Bugs!
Students will learn about the various insects that are commonly found in the garden. They will use their imaginations to identify whether various insects are beneficial or destructive within the garden.
Students will:
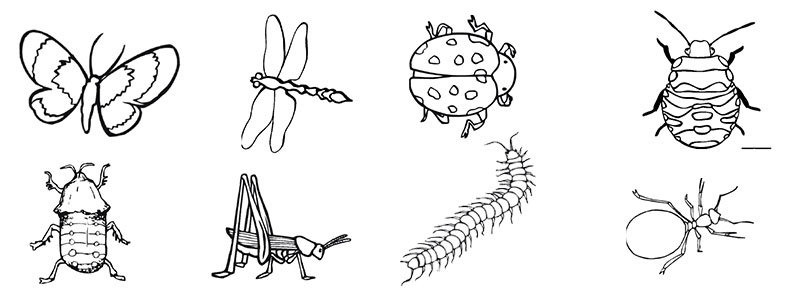
•Identify various garden insects. (Include: Lady beetles,gypsy moth, cabbage worm, aphids, caterpillars, praying mantis, etc.)
• Discover whether each insect is beneficial or destructive within the garden.
• Understand how to eradicate pest (without using dangerous/ harmful pesticides) or distribute insects within the garden.
Time Required For Lesson: 2 Days
Materials / Resources
- Good Bug Photos
- Bad Bug Photos
- Construction Paper with preprinted insect images
- 10 X 10 Plexi Glass
- beads / glitter
- fabric pieces
- glue / tape
Pre-activities
Students should research and be introduced to insects that are common to the region in which they live. Make sure that children know what to do if they encounter any insects covered in the lesson. Make note of the insects and the plants that it targets. Learn how to eradicate pest in the garden without the use of dangerous and harmful pesticides .
Students will compare the various insects and plants that they target. Students will have the prints placed behind the Plexiglas using a piece of tape. The print will be placed so that it is viewable through the Plexiglas. The children will decorate the insect prints on the actual Plexiglas using, glitter, beads, fabric, etc. The shinier and more eye catching the better!
Encourage the students to use their imaginations to illustrate and decorate the insect. Consider things like camouflage and blending in, intimation to scare predators by use of bright shiny color, etc.
Allow each student to present his/ her art discussing why they chose the various elements included within their design. Reveal and compare with actual photos of various insects and share facts about each. Emphasize whether each insect is beneficial or harmful to the garden.
Resources
The Rot Way to Garden!
Students will be introduced to the idea of composting and learn the basic principles of biodegradable resource conservation and recycling. The students will learn about building a compost pile, the creatures that may dwell in a compost pile and the benefits of compost for plants.
Students will:
- Learn the basics of composting
- Discover the benefits of composting and recycling
- Learn about the creatures that live in the compost pile
- Understand what biodegradable materials are
Time Required For Lesson: 2 Weeks
Material / Resources
- biodegradable samples (Paper, Leaves, Cardboard boxes)
- non-biodegradable samples (Juice can / Soda bottle, Plastic cups)
- bucket
- trowel/ spade
- soil
- compostable materials ( Grass clippings, leaves, Paper, Food scraps from participants)
- water
- earth worms
- magnifying glasses
Pre-activities:
Students should discuss materials that we use every day and what could be considered biodegradable or non-biodegradable. Some of the materials, such as metals and plastics, are non-biodegradable. These materials do not decompose, although many of them can be recycled. Biodegradable materials decay. Examples of biodegradable materials include wood, food scraps, paper, and grass clippings.
Activities:
Students discuss compost, what it is, how its made and why its beneficial. Teach the students, that with the help of micro-organisms and insects, we can take our biodegradable materials and turn them into a rich, dark soil amendment called compost. In this way, valuable nutrients are returned to nature rather than shipped away to a landfill. Composting is an excellent way to demonstrate the cycle of life: life, death, decomposition, and rebirth.
The four essential ingredients of compost are the BIG FOUR:
- browns
- greens
- air
- water
“Browns” are dry and woody plant trimmings, such as wood chips, dried leaves, and straw. Browns are rich in carbon. “Greens” are moist vegetable and fruit scraps, green leaves, and fresh manure. Greens are rich in nitrogen. In a compost pile, you want approximately half brown materials and half green materials by volume. Decomposer organisms need air and water to break down organic matter.
Turning and watering your pile provides it with the air and moisture needed for microorganisms. The pile should be as moist as a wrung out sponge. These four ingredients create the perfect environment for the main decomposers: fungi, bacteria, and insects.
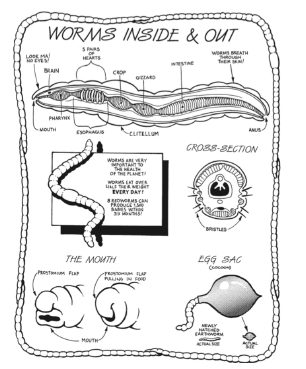
Discuss the anatomy of an earthworm
Make Compost in a Bucket
The entire class can follow the composting process taking place in a single bucket. You could also have several buckets with different types of materials. It is important to maintain the buckets by opening and turning the material with a trowel every few days to keep the compost aerated.
You may want to collect materials from students a few days before the presentation. It is also a good idea to add more browns than greens to your bucket. It will not heat up as fast, but it will avoid potentially bad odors. Discuss how composting is nature’s way of recycling. Talk about why people would want to compost and why it is important. Explain that the class is going to perform an experiment recycling compostable materials by making compost in a bucket. Ask the students for materials they collected for the compost. Add about one gallon of soil, compost, potting mix, or sawdust from untreated wood to the 5-gallon bucket. The bucket should not be more than 3⁄4 full. Keep material moist but not completely wet.
Have participants write their predictions about what will happen to the contents of the bucket and the individual items.
Will it smell bad? Will it decay? Will things grow in it? What will happen to the banana peels?; the plastic cups? The teacher may wish to keep a classroom chart recording the temperature, odor, texture, weight, and other observations about the compost. Discuss the outcome with participants. What happened? How was it different from what they expected? Explain that, with the help of bacteria and other organisms, all organic material can decompose into a rich, dark compost. Compost helps make healthy soil and can be used on lawns, gardens, or house plants.
Use magnifying glasses to observe life & creatures living within the compost.
- What color is the worm?
- What shape is the worm? Describe it.
- How does the worm’s skin feel?
- Is there a difference between the top side and the bottom side of a worm? Describe what both sides are like.
- Can you tell which is the front end of a worm and which is its tail? How do you know?
- Does an earthworm have… EYES? EARS? LEGS?A NOSE?A MOUTH?
- How does your worm move? Describe it.
- What’s the name of your worm?
- Why are worms important to life on earth?
The structure of soil is improved when compost is added. Compost increases the soil’s ability to hold water, helps soil to achieve a good airflow, and adds nutrients for plants. Compost will reduce the risk of plants getting diseases and will give life and vitality to your soil. Healthy soil means healthy plants. Healthy plants mean healthy animals and people.
Resources
How Compost Is Made
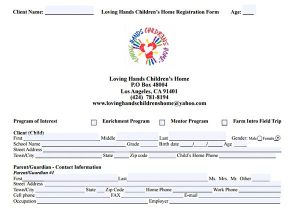

Contact Us
Mailing Address:
P.O Box 48004
Los Angeles, CA 90048
Phone: (424) 781-8194
Email: lovinghandschildrenshome@yahoo.com
We are open 7 days a week!
![]()
We accept all forms of donations